3 Quick Tips to Manage Your Cloud Recordings
Previously we’ve discussed 3 tips for setting up your Foscam on wireless. We’ve been working hard on making it easier for you to manage your cloud recordings.
Here are 3 quick tips that would help you have an easier time managing your cloud recordings on Camcloud.
3. Using the Schedule Feature
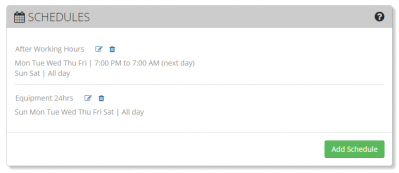
Under the “My Account” tab in “Settings”, you can set up the schedule of when each camera can start recording. What’s cool about this feature is that we’ve given you the flexibility of giving each camera multiple schedules.
Different ways that you can use it include turning a camera on after working hours, when you’re away from home, and even having a camera on for 24 hours a day. This would help you out whenever you’d like to know what’s going on in your property.
#2. Set Your Motion Detection Area
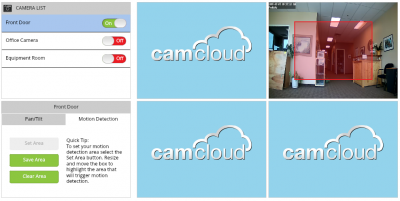
Note: This feature works for supported cameras only.
Another way to manage your cloud recordings is through setting up the motion detection. You can do this by clicking on the “Live View” tab, then click on the camera of choice and setup the motion detection area there.
All cameras have ways to fine-tune their motion detection settings.
If you have a D-Link Camera, we’ve made a specific guide on how to setup motion detection for D-Link cameras.
#1. Using the Global Motion Detection Tool
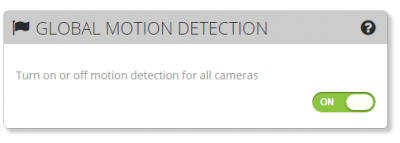
Under the “Cameras” tab, the “Global Motion Detection” tool allows you to turn on or off motion detection for all cameras.
This means you can disable motion detection on an individual camera level as well as use the “Global Motion Detection” tool to turn it on/off across all cameras simultaneously. This is kinda like an alarm’s “arm/disarm” switch. giving users full control over their motion detection.
If you’re looking for a surveillance camera cloud storage service, try out Camcloud’s free plan. We also have several paid plans that offer a large amount of cloud storage.
No Comments