Configure Motion Detection for Axis Camera
Axis IP cameras have a great reputation, and for good reason. You can use Camcloud video monitoring with an Axis camera (you can read our Axis Setup Guide) and we recommend them to our customers. One question that comes up regularly is how you tune it for optimal motion detection. I’m most familiar with the M series of Axis cameras but this should apply to most other Axis cameras. Specifically I’m going to use my Axis M1031-W camera for this tutorial.
First of all you need to login into your camera with whatever IP you have setup and go to Setup->Events->Motion Detection.
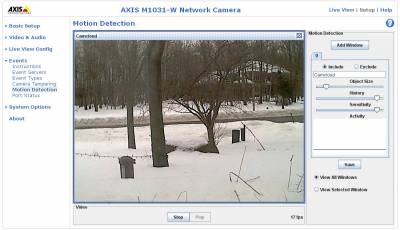
For the purposes of this tutorial I want to focus on three key parameters you will want to play with but I should note window placement is also equally important and is covered in this blog. They are the “Object Size”, “History” and “Sensitivity”. If you click the question mark Axis provides some documentation on guidelines for these parameters.
Object Size is pretty self explanatory. The more you move the slider to the right, motion detection will only trigger on larger objects. By default it is set at 15% (that just means the slider is mostly to the left, for some reason the documentation talks about percentages but they don’t show percent values when you move the slider). The best way to play with this is to have your motion detection window up and start triggering a motion with the camera. Take a look at the picture below.

Here I have Mr. Stuffed Dinosaur (as we call him) dancing across the screen. When you trigger motion it will show you that an object has been detected. The blue area simply shows the object has not crossed the boundary of motion detection you have setup (the black line represents the Object Size) while the red shows it has crossed the boundary. The red area is the only thing that will actually trigger notification to the user that some motion has been detected.
History, according to the Axis documentation, is defined as the object memory length. Selecting a high history level (move the slider to the right) means that an object will trigger motion detection for a long time before it is considered part of the image. At a low history level an object will trigger motion detection for only a short period. Essentially this means you can run in front of the camera waving your hands like a lunatic. Once you stop the camera will treat you as part of the image. History is just the amount of time it takes to do that.
Finally Sensitivity, it’s not exactly what you expect according to the documentation. The documentation describes the color of objects. But in practice it is simply that the higher the sensitivity the better chance it will identify the object. Typically you want this high.
Easy right? Well, it gets a bit more complex. Distance and speed of the object also comes into play. Take for example distance. Remember Mr. Stuffed Dinosaur, what happens if we move him back a mere 5 feet compared to our Object Size experiment.
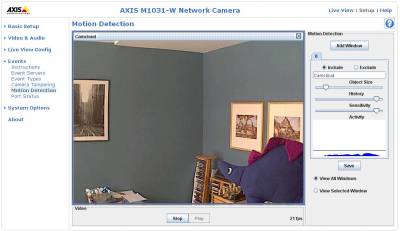
The motion detection area is all blue and would never trigger a motion notification. In this case I would adjust the Object Size. In addtion to distance, speed will change the motion detection, for example if someone runs across the screen it is harder to detect that motion so you will want to play with all your settings here. A good example of when I compensate for speed is for my window camera. Basically I have a camera that points out the window into the street. It is a busy street, the last thing I want is every car to fire off a notification. In my case I’ve increased the object size and lowered the sensitivity. I’ve got it tuned so that only very large trucks will fire a notification.
There is no real answer on what settings to choose. It depends if you just want to watch Fido or you are using the camera to monitor your house from intruders. Make sure you play with each setting to get a feel for different motion detection capabilities. In my experience, I usually stick with adjusting Object Size and Sensitivity, History hardly ever comes into play.
No Comments