jquery

jQuery Form Validation Tutorial

There are lots of ways to perform validation on your html forms but nothing is easier than using jQuery’s validation plug-in. I’ll take you through a small tutorial to help you understand how to make it work. Let’s take a look at what you can do and how you can customize the built in validation.

Of course as always make sure you reference the main site here along with all the available validation methods found here. There are also a few good tutorials like this one and especially this one, but I wanted to take the layman’s approach right from the beginning. Let’s go into details of what is needed using a simple HTML form example.

As part of this tutorial I’ll take you through these items:

1. Use HTML and CSS for jQuery validation
2. Use jQuery to define your own validation rules
3. Define more rules with custom messages
4.Create your own custom jQuery validation method

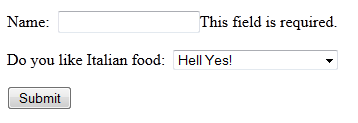
First let’s start with the very simplest form using HTML/CSS:

<head>
<meta charset=”utf-8″ />
<script language=”javascript” type=”text/javascript” src=”https://ajax.googleapis.com/ajax/libs/jquery/1.8.3/jquery.min.js”></script>
<script language=”javascript” type=”text/javascript” src=”http://ajax.aspnetcdn.com/ajax/jquery.validate/1.10.0/jquery.validate.min.js”></script>
<script>
$(function() {
   $( “#mytestform” ).validate();
});
</script>
</head>
<body>
<form id=”mytestform” name=”” method=”get”  action=””>
                  <p>
                   <label for=”aname”>Name:&nbsp;</label>
                  <input name=”aname” class=”required” minlength=”4” size=”20″ />
                   </p>
                   <p>
                  <label for=”food”>Do you like Italian food:&nbsp;</label>
                  <select id=”italianstatus” name=”italian_food”>
                          <option value=”yes” selected=”selected”>Hell Yes!</option>
                          <option value=”no”>Makes me wanna puke</option>
                          <option value=”sometimes”>Just on Monday</option>
                  </select>
                  <input class=”submit” type=”submit” value=”Submit”/>
                   </p>
   </form>


</body>


The key here is the the input field for the name has “minlength” and “required”. This will either trigger an empty name or give you the message if the length of characters is smaller than 4.

jquery-val-2

It is easy as that. One line of jQuery code. For more details on the attributes you can use see Raymond’s blog. First thing that jumps out is that the styling is butt ugly. Just add a little color and positioning and you are set.

<style type=”text/css”>
label.error { float: none; color: red; padding-left: .5em; vertical-align: top; }
</style>

jquery-val-1

Okay but how about defining those rules in jQuery for more customization? Simple, add to your validation routine and remove the “minlength”/”required” attributes from the HTML:

<head>
<meta charset=”utf-8″ />
<style type=”text/css”>
label.error { float: none; color: red; padding-left: .5em; vertical-align: top; }
</style>
<script language=”javascript” type=”text/javascript” src=”https://ajax.googleapis.com/ajax/libs/jquery/1.8.3/jquery.min.js”></script>
<script language=”javascript” type=”text/javascript” src=”http://ajax.aspnetcdn.com/ajax/jquery.validate/1.10.0/jquery.validate.min.js”></script>
<script>
$(function() {
   $( “#mytestform” ).validate({
           rules: {
                   aname: “required”
           }
   });
});
</script>
</head>
<body>
<form id=”mytestform” name=”” method=”get”  action=””>
                  <p>
                   <label for=”aname”>Name:&nbsp;</label>
                  <input name=”aname” size=”20″ />
                   </p>
                   <p>
                  <label for=”food”>Do you like Italian food:&nbsp;</label>
                  <select id=”italianstatus” name=”italian_food”>
                          <option value=”yes” selected=”selected”>Hell Yes!</option>
                          <option value=”no”>Makes me wanna puke</option>
                          <option value=”sometimes”>Just on Monday</option>
                  </select>
                  <input class=”submit” type=”submit” value=”Submit”/>
                   </p>
   </form>


</body>

Let’s keep on building on this. Let’s add a bunch of new criteria such as minimum/maximum length and even custom messages. Nothing changes with the HTML or libraries so here is the changes to the jQuery code:

<script>
$(function() {
   $( “#mytestform” ).validate({
           rules: {
                   aname: {
                           required: true,
                           minlength: 4,
                           maxlength: 20
                   }
           },
           messages: {
                   aname: {
                           required: “Dude, enter a name”,
                           minlength: $.format(“Keep typing, at least {0} characters required!”),
                           maxlength: $.format(“Whoa! Maximum {0} characters allowed!”)
                   }
           }
   });
});
</script>

You can see that I’ve added a few more criteria along with the custom messages. I’ve tied it all to the name in the form “aname”. For the other fields in your form just add to this depending on the name. I’ve also introduced the format method in the message. This lets us replace the argument given for minlength and maxlength. Handy to know that we don’t have to worry about hard-coding that value if they ever change.

To finish it up, lets add a custom validation routine. Again easy with the plugin. This is where the plugin’s addMethod comes into play.

<script>
$(function() {
   $( “#mytestform” ).validate({
           rules: {
                   aname: {
                           required: true,
                           minlength: 4,
                           maxlength: 20,
                           customvalidation: true
                   }
           },
           messages: {
                   aname: {
                           required: “Dude, enter a name”,
                           minlength: $.format(“Keep typing, at least {0} characters required!”),
                           maxlength: $.format(“Whoa! Maximum {0} characters allowed!”)
                   }
           }
   });
   $.validator.addMethod(“customvalidation”,
           function(value, element) {
                   return /^[A-Za-z\d=#$%@_ -]+$/.test(value);
           },
   “Sorry, no special characters allowed”
   );
});
</script>

This is a regex example to test for special characters. Here I’m allowing some special characters but others I’m not. So if you enter “*” or “!” for example, you will get the message. Pretty cool huh?

These are the steps I went through to understand this plugin. I’m certainly not an expert (far from it) so comments are most welcome. I hope this can help you on your way.

If you’re looking for a surveillance camera cloud storage service, try out Camcloud’s free plan! You can turn your webcam into a security-cam in 2 minutes! We also have several paid plans that offer a large amount of cloud storage.

_

Brendan Harrison
brendan@camcloud.com
No Comments

Post A Comment

Ready to get started with Camcloud?
Find out how easy it is.