Setup a Cloud IP Camera in 3 Easy Steps!
IP cameras are growing in popularity and are becoming much more cost-effective for home and small business use. Most of these devices have a pretty decent feature set, and often include some motion detection features and basic alert system, however to get the most value out of your camera, you’ll want to consider features such as:
- Cloud storage of recorded video or images
- Mobile connectivity from your smartphone
- Ability to view live video from anywhere, on any device
- Ability to manage multiple cameras easily
How do you get all these features? The answer is to connect the camera to the cloud and turn your standalone device into a cloud IP camera.
Getting these features on your own isn’t really feasible, or at best can be quite time consuming. The best idea is to use a 3rd party service; we offer one called Camcloud, but there are others. This way you’ll get more bells and whistles and have an easier time setting it up. Regardless of the approach, there are three steps required to setup a cloud IP camera:
1. Add your camera to Camcloud using our “Add Camera Wizard”.
2. Setup Your Motion Detection & Pan/Tilt Functionality.
3. Make sure your timeline page is getting populated.
(This isn’t meant to be an exhaustive guide, read our IP Camera Setup Guides here for more details).

1. Add your camera to Camcloud using our Add Camera Wizard. In our case, that involves signing-up for a free account at www.camcloud.com. From here, you need to tell the cloud service the IP address of the camera, as well as the camera login credentials. First Login to Camcloud.com, and click on the “CAMERAS” tab.
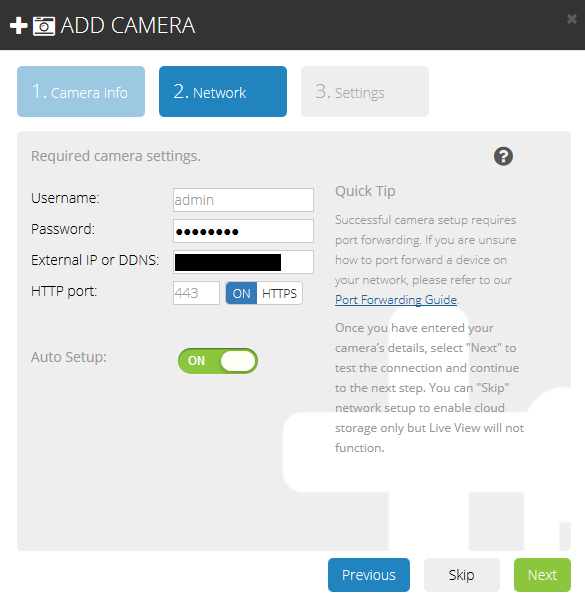
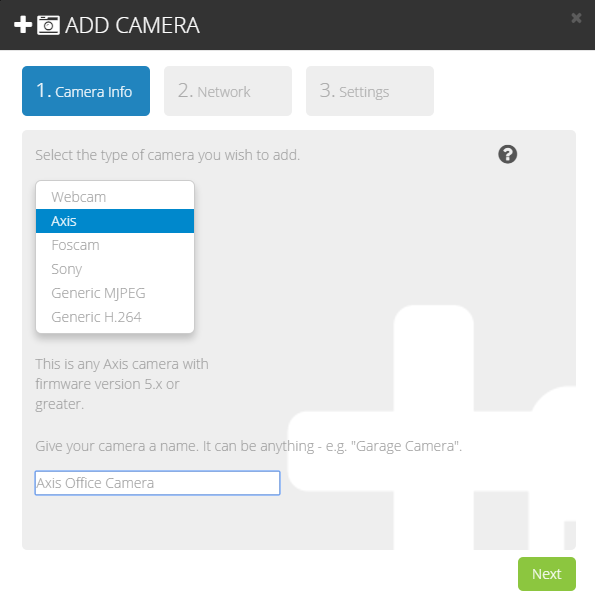 Click on “Add Camera” and pick “Axis”. You can name your camera whatever you’d like. Once you click on next, you’ll have to add in your camera’s username, password, IP address, HTTPS and RTSP ports. You’ll need to port forward your router to the IP camera so the cloud service has permission to access the camera.

This means both your RTSP and HTTPS ports need be forwarded on your router.
Once you have an Axis camera on your network, you can find the IP address. (Note: To enable HTTPS on an Axis camera, go to Advanced TCP/IP settings and ensure the HTTPS port is set to whatever you like (default 443). To enable HTTPS go to System Options -> Security -> HTTPS. Use “client: for the certificate”. Change administrator to use HTTPS only or HTTP & HTTPS. Now it can be added to Camcloud using HTTPS.)
 2. Setup Your Motion Detection & Pan/Tilt Functionality.

Since the setup is complete, it will get added to your list of cameras. Go over to the Live view tab and see if it works.
You can take a look at what’s happening right now from the “Live View” tab. You can also change the camera’s positioning through its Pan/Tilt Functionality here if your camera supports it.
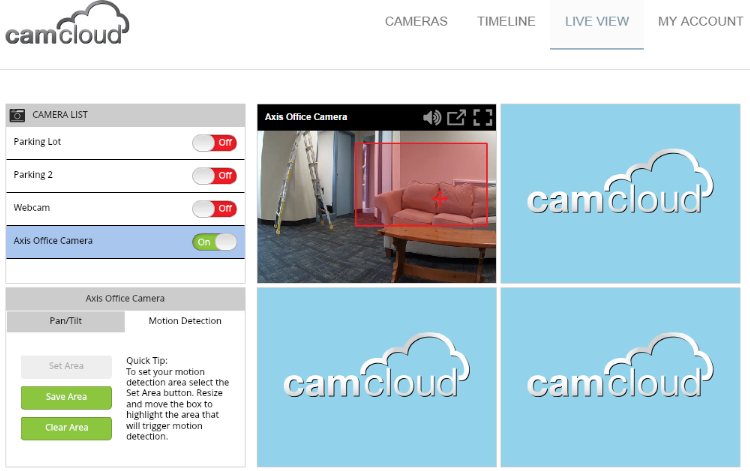
Setup the camera’s Motion Detection by clicking on the Motion Detection. To change the camera’s motion detection area, move the red box around, increase or decrease its size, then click on “Save Area”.
3. Make Sure Your Timeline Page is Getting Populated

Whenever there’s motion activity, your video and image recordings will be saved and stored in the cloud which allows you to access it from anywhere, including your Android or iOS device.
That’s the basic concept behind setting up a cloud IP camera. Remember, read our IP Camera Setup Guide if you want to do this with Camcloud and try out our free plan.
That’s it for the setup! If you have any questions, contact us at support@camcloud.com
Anish shah
Posted at 13:23h, 25 Februaryhi I have purchased cloud ip camera device from USA and trying to connect in India. and trying to instal the device. Model-creakar c 366 hd monitor. The camera is not connecting to my internet modem. May be it has some compatibility issues .could you please help me ahead in the same matter.
Marwan Alshafei
Posted at 16:08h, 01 MarchThanks for the comment Anish! You can contact support@camcloud.com for immediate assistance from our support team.
Laura
Posted at 21:16h, 22 AugustHi Anshi,
Well, there are devices that help to solve problems connecting the IP cams. Try to find something as shown in this tutorial https://www.youtube.com/watch?v=GBHHzQyka4o
Craig Davidson
Posted at 21:03h, 19 OctoberIs this secure? Can anyone see my children’s camera?
Brendan Harrison
Posted at 15:55h, 01 MarchBest to email support@camcloud.com with specific questions.
Here’s our server IPs if you want to whitelist our servers on your firewall: http://support.camcloud.com/knowledge_base/topics/whitelisting-your-ips
khaled
Posted at 01:27h, 16 Julydose it work with VStarcam??
Tracy
Posted at 16:29h, 31 JulyThe camera is set up and working well but I cannot get the audio to work when I talk back too my dogs through my phone, how do I do this please
Brendan Harrison
Posted at 19:00h, 03 AprilYou can try our Supported Cameras Database at cameras.camcloud.com