
Best Tips to Port Forward Your IP Camera
Here at Camcloud the topic of port forwarding your IP camera comes up often. I thought it was time we refreshed some tips and tricks I use to setup port forwarding. In order to view your IP camera outside your local network you need to port forward the camera.
UPDATE: Be sure to read our full list of Tips & Tricks below, but you can start with our new video that provides a great overview.
Full List of Tips & Tricks:
Before you get started, make sure your camera is setup and working properly on your local network. You can setup the local connection using ethernet plugged in directly to the router or setup the camera so it works wirelessly.
Now that you have your camera working on the network, you can setup port forwarding. Here is a review of the common instructions:
- Login to your camera’s admin interface and go to the network settings area. Confirm what port has been assigned to your camera. Often it will be port 554, 80 or 88 but could be anything.
- Now login to your router and look for a menu called ‘port forwarding’ (sometimes it will be under an “Application and Gaming” menu). Once in this menu, create a rule to forward the port selected from Step (1) to the internal (192.168.x.x or 10.x.x.x) IP address of your camera. Be sure to assign the port number to both the internal and external ports. If there is a protocol option, choose TCP or BOTH.
Tip #1: Know the ports
First of all it is important to know what port you need to forward. This depends on the type of camera. For example if you are setting up a Foscam camera typically you only need one port, HTTP (usually port 80 or 88 in the case of Foscam). Some cameras will require you to setup the RTSP port (usually port 554). Some require BOTH the RTSP and HTTP port. If you are setting up your camera on Camcloud, it will ask you for one or both of the ports and that is how you will know what to port forward. Log into your camera’s web interface to verify the ports that are used.
Tip #2: Use help resources
If you are a total newbie with port forwarding, don’t be scared. It is quite easy, you just need the proper resource. If you Google search your router name along with “port forwarding” often you will find documentation from your router. But even better, just go to http://portforward.com. This site has an extensive list of routers and applications you can use to help you understand how to port forward for your router. The key here is to navigate to your router (the link above gives you a direct link to the router list), skip all the ads then select an example camera. For example select any Foscam or D-Link in the list. This may not be your camera but the point is just to see how a port is forwarded.
Tip #3: Port 80 is evil
Many cameras by default use port 80. Bad idea. Everything uses port 80. Avoid conflicts with other devices by changing this. I’ve even seen some ISPs forbid this. In fact many ports under 1024 are already reserved. Safe yourself some headache and just change it now to something >1024. Simply log into your camera’s web interface, find the HTTP or RTSP port (depending which one you are using) and change accordingly. Remember if you change the HTTP port to access your camera locally add the port, for example: 192.168.1.20:8080.
Tip #4: Multiple cameras
If you have more than one camera you can’t use the same port. You will need to increment accordingly. If you have one camera setup on port 8080, change the next one to 8081 and so on.
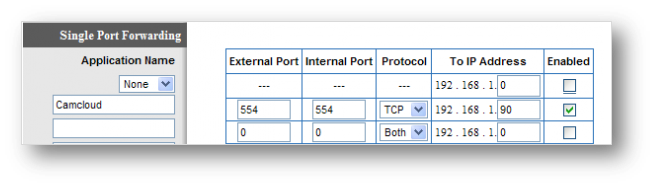
Tip #5: Enable button
In the screen shot above I can’t tell you how many times someone has just forgotten to “Enable” the rule. Many routers let you create the rule, but don’t actually turn it on or “enable” it. Sometimes this is a checkbox or simply a button to apply settings.
Tip #6: Buggy routers
Some routers have bugs. This is reality. I’ve found several routers that have caused me tons of pain. Typically they have come from the ISP branding their own device. For example here at work we have a Bell router. Took me a long time to figure out but when you create a rule and name that rule you can’t use spaces. So for this router I would select “Create a new rule” I would name the rule “Camcloud camera” because seemingly it can be anything. Then I fill out the rest. Awesome it works. The gotcha is that the next rule you create won’t work. Intuitive no?
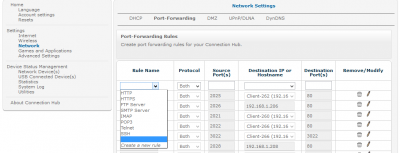
Tip #7: Create rule or custom application
In the screen shot above it shows some default “rules” or “applications”. Those will never match what you need. Sometimes it lists tons of applications such as games. They are trying to help you along the way by providing some default ports. You don’t need this. So in most cases you will have to “Create a new rule” as shown above or in many cases you will need to create a new “application”. So the process of port forwarding is a two step process. Here is an example of one router where not only do you need to enable “Application support” first then you have a 2 step process just to add the rule.
Tip #8: Test it works
How do you know your port forwarding works? Try any one of the many port checking tools on the web. I like using the one from yougetsignal. Enter in the port you just forwarded and that’s it. It will tell you if it is open (success!) or closed (you failed!).
This might seem like a lot to know. But it really is simple as long as your router behaves as it should. Hope these tips help.
How to Setup a D-Link DCS-2332L IP Camera with Camcloud
Posted at 20:52h, 23 December[…] is where you give Camcloud the camera’s login credentials, IP address and port. It requires port forwarding to work with IP […]